Lesson 3: Create your site
Back to Lesson 2
- This lesson will use internal hash(#) links to create a website with many pages contained in one file
- You can copy and paste the code and then write your own content depending on the product you are trying to create
- Web languages (HTML, CSS and Javascript) are good for Eportfolios and Ebooks and do not have to be on the public internet
Getting Started
You need to start with a page with one <h1> and some <h2>s. If you have followed the previous lessons you will also have a <head> and <style> tags. I’ve left them out for now to make it simpler for new comers but we will be using them
<h1>My Website</h1>

<h2>Home</h2>
Write intro here

<h2>Page 2</h2>
Blah blah about Page 2

<h2>Page 3</h2>
Intelligent comments about Page 3
I have a my page ready
id & Class attributes
HTML
<h2 id="TheBible">
<h2 class="book">
Any tag can be given an id or class attribute (or both) that allows for more flexible styling.
- ID is for unique elements and each id should only be used once.
- Class is for a group of elements all of which will take the same style
CSS
#TheBible {font-style:serif}
.book {font-style:sans}
h2.book {font-style:sans}
# is for id and “.”is for class. The last statement will apply the same style to the h2 tag but would not work on <h1 class="book">
We want to identify each Page title so should we use id or class?
Also See
Identifying the Pages
Add id attributes to your h2s so we can link to them
<body>
<h1>My Website</h1>

<h2 id="home">Home</h2>
Write intro here

<h2 id="p1">Page 2</h2>
Blah blah about Page 2

<h2 id="p2">Page 3</h2>
Intelligent comments about Page 3
</body>
Also notice the body tags
Space for Scrolling
We are going to scroll the document up and down to appear as though we are changing pages. To do this we need to create space by using margins and padding
CSS
<style>
body {padding-bottom:600px;}
h2 {margin-top:200px;
border:2px solid magenta;}
</style>
To understand the difference between margins and padding you need to understand the CSS “Box Model” (Next Section)
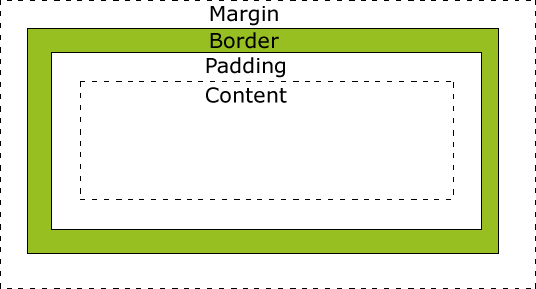
Box Model
- Margins are outside the border
- Padding is inside the border (Note: The border might be invisible)
I know the difference between margin and padding
Also See
Fix the Title
HTML starts placing elements in the top left corner of the doc. Remember the difference between “inline” and “block” elements? (check here)
- Inline HTML elements (text & images) are positioned after each other and they flow onto the next line if necessary.
- Block elements automatically start on a new line (eg. headings)
- The vertical placement depends on the elements that came before
However there are other ways of positioning elements on a page using CSS.
- Take the h1 out of the normal HTML document flow by fixing it at the top of the page
h1 {position:fixed; top:0px}
The rest of the document should flow underneath the title (you could always put a white background on it if you think that looks silly)
Internal Links
At the top of the body you need the following links:
<a href="#home">Home</a>
<a href="#p2">Page 2</a>
<a href="#p3">Page 3</a>

Tag       -> a
Attribute -> href="#home"
Content   -> Home
By clicking on the word “Home” you get taken to the h2 tag where id=”home”
I understand how internal/hash links work
Alternative Explanation
Div it up
a Div Element is an invisible container that allows you to group or style its contents. Div is a block level element (if you want an inline invisible container use <span>
We are going to
- group the navigation elements
- label the navigation with class=”nav”
code
<div class="nav">
  <a href="#home">Home</a>
  <a href="#p2">Page 2</a>`
  <a href="#p3">Page 3</a>
</div>
also
we can group the Title in the nav too.
<h1 class="nav">My Eportfolio</h1>
Fix the Nav
Now we have labelled the nav elements
.nav {position:fixed}
Head & Title
Why do we need the head
DOM Document Object Model
Modern websites that are controlled by javascript need to correspond to the DOM. This means adding:
- Doctype
- html element
Then the model corresponds to the following diagram:

A good attempt
This code works pretty well. Copy and paste it or try it in jsfiddle here
Its standard practice when you are developing websites to change your approach even when you thought you had almost finished. That’ts what I’m going to do. Because I’m not happy with yet.
What do you think is wrong with this code?
<!DOCTYPE html>
<html>
<head>
<style>
body {
    padding-bottom:600px;
    }
h1 {padding-top:20px}
h2 {
    margin-top:200px;
    padding-top:100px;
}
.nav{
    position:fixed;
}
</style>
<title>Openk Web</title>
</head>

<body>
<h1 class="nav">My Eportfolio</h1>

<div class="nav">
<a href="#home">Home</a>
<a href="#ss">Spreadsheet</a>
<a href="#db">Database</a>
</div>

<h2 id="home">Home</h2>
Write intro here


<h2 id="ss">Spreadsheet</h2>
Blah blah about spreadsheet


<h2 id="db">Database</h2>
Intelligent comments about the database


</body>
</html>
A Better Approach
On the previous section when you first open the page, the home page title is too low. If you then click the home link it jumps up. So here is a new approach for our ‘website in a single file’
I don’t like to use too many unnecessary div elements, but in the end I think this page does work better with each “page” having its own div eg.
<div class="page">
  <h2 id="p1">Page 1</p1>
  Blah blah blah about Page 1

</div>
This allows us to put a big bottom margin on the “page” to create the space we need to make only one h2 appear on the page.
Final Code for Template
- Edit the code here on JSbin
- or copy and paste this
code
<!DOCTYPE html>
<html>
<head>
<style>
body {
    margin:0px;
    padding:0px;
    padding-bottom:600px;
    }
h1.nav {padding-top:10px}
h2 {
    margin-top:0px;
    padding-top:80px;
}
.nav{
    position:fixed;
    top:5px;
    left:5px;
}
div.page {margin-bottom:800px; padding:5px;}
}
</style>
<title>Openk Web</title>
</head>

<body>
<h1 class="nav">My Eportfolio</h1>

<div class="nav">
<a href="#home">Home</a>
<a href="#ss">Spreadsheet</a>
<a href="#db">Database</a>
</div>

<div class="page">
<h2 id="home">Home</h2>
Write intro here .. Who what where when how why?

</div>

<div class="page">
<h2 id="p2">Page 2</h2>
Blah blah about Page 2

</div>

<div class="page">
<h2 id="p3">Page 3</h2>
Intelligent comments about page 3
</div>

</body>
</html>
Next Steps
The next lesson is about taking this template and turning into your own website. You can always return to Lesson 3 if you are unsure
- Change colours and fonts.
- Use JSbin to speed up your styling
- Write your content
- Download your website from JSbin and edit in dreamweaver or another WYSIWIG editor
Lesson 4: Style your Website
JSbin
JSbin.com is the fastest
- for styling web pages and testing Javascript JS
- Instant results no save and refresh
- Made in Sussex
[image how to download]