- Lesson:GameMaker Studio 2
- Please login to keep your results
- Welcome,
GameMaker Studio 2
GameMaker produces better looking games than Scratch but is more complicated. The free version can be downloaded for home use if you wish (but please create your own account).
- Event driven environment that can be programmed using Drag and Drop actions or Code (which is similar to Javascript)
- There is a lot of help online for Version 1 of Gamemaker. The events were (almost) the same but the Room builder is very different
- Use 16×16 Sprites only so you can draw quicker (don’t forget to enlarge the object when placed into the room)
![]()
| Type of Movement | Simple Game | More Complex Game | Also See | Link |
|---|---|---|---|---|
| Step Based Movement | Frogger (Scratch:GIF) | Athletics | This Tutorial | |
| Constant Velocity | Car Racer | Pong | Skier | |
| Momentum | Defender | Asteroids | ||
| Gravity | Platformer | Angry Birds | Flappy Bird | |
| Parallax Scroll | (Sonic 1991) | .. | .. | Not Yet |
| Perspective | Endless Runner | Subway Surfer | .. | Not Yet |
Objects are Everything
Artists and Designers may think the room is more important, but for Computer Scientists the Object contains all the interactivity (events and actions) and therefore it is what we are most interested in.

Instructions / Workflow
- Create Sprite
- Add Sprite to Object
- Add Event (to Object)
- Add Action (to Event/Object)
- Add Object to Room
Advanced
- Parent Objects (so children can inherit events and actions)
- Folders/Groups
Movement: Events & Actions
We program our game by adding events and actions to the objects.
Events
Key Input Events
- KeyPress-J
- KeyUp-J
- KeyDown-J
Outside Room Event
- Events > Other > Outside Room
Actions
Step Based Player Movement
If your sprite faces in a certain direction you will need “Set Instance Rotation”
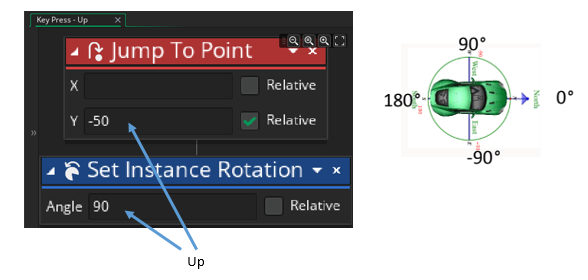
Jump to Point (Relative) will change the position of the object instance a certain number of pixels.
- Notice that the origin is at the top left of the screen so up is a negative change in y.
- If you forget to click the Relative tick-box, in the example Y=-50 above, the object will disappear off screen. Or it could return to the same place on the screen and will appear not to be move at all.
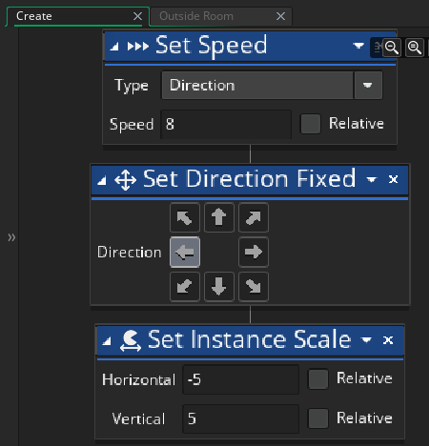
Continuous Movement
These actions move the enemy to the left. You can work out the other directions yourself.
– For the player use the KeyPress – Left Arrow Event
– For the enemy, use the create event. This will set the speed and direction when the Enemy is created
Outside Room
Use the Jump to Point (Not Relative) Action to the Outside Room Event (in the “Other” Group)
Collision Detection

Gamemaker has the COLLISION Event that tells you if the instances of two objects are colliding. You can choose the following actions on “Self” (the object you are editing) or “Other” the object you are colliding with.
- Die and/or Restart Room
- Respawn
- Score Point (see next Learnstone)

Scoring: Displaying Variables
Use the Draw GUI Event
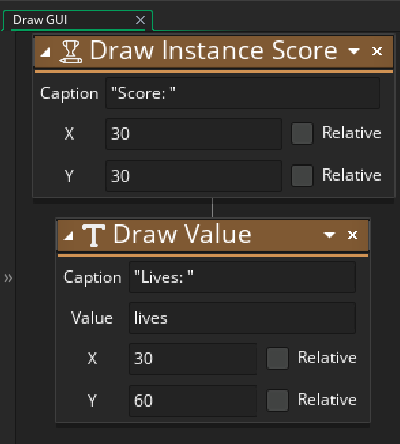
The Draw Instance Score Block will display the score in the top left of the screen. If you use the relative option the score will be drawn in relation to the object eg. Above player’s head. Use the second Block to draw other values such as lives or health.
Built-In Variables
The variable “score” already exists in Gamemaker. It starts with a zero value. Note the Drag ‘N Drop interface uses “__dnd_score” so be careful not to get these two confused.
Other Built-in Variables
- health
- lives
- sprite_height
- room_width
Random Enemy Movement
- Introducing Random Variables
Game Play
- Good Challenge: Not to easy, Not too hard
- New Levels (with new enemy and new challenges)
- Surprise me (eg. with sound, animation unexpected movement)
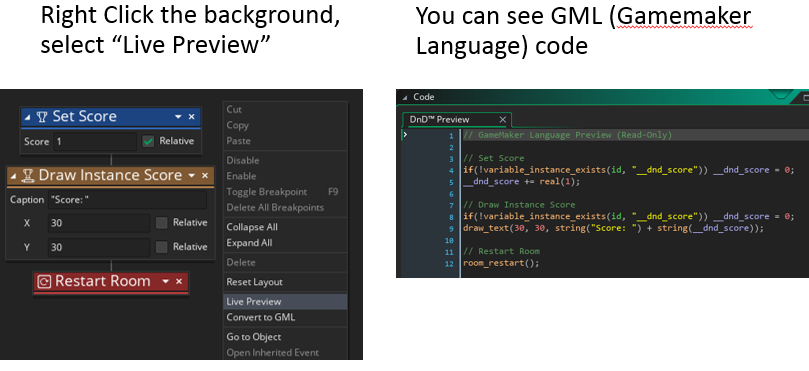
Towards GML
Gamemaker Language is away of programming events and actions in code.
Using Code Blocks
-Create event runs once when the instance of the object is created
-Step event runs every frame (eg. 60 times per second)
Getting Started with Code using “Live Preview”
If you want to learn GML the best thing is to translate your DragNdrop blocks into code using Live Preview. Don’t convert your blocks as this process is NOT reversible.
Animating Sprites
-Automatic
-Controlled
Room Layers
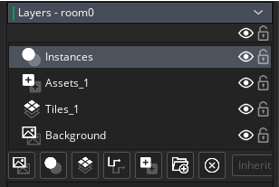
The image above shows the Instances layer on the top and the Background layer on the bottom. You can move layers up and down by dragging them.
- Instances Layer. Only objects can be placed on this layer.
- Assets Layer. Sprites may be used on this layer, but remember sprites are not be interactive, only objects are
- Tile Layer. A tile set can imported as a Sprite then converted into a tileset. The Tileset can then be linked to the Tile Layer
- Background Layer. Only useful for setting the background colour. Adding an image is not very useful. It will appear top left and can be tiled. Better to use an Asset layer.
Camera & Viewport
- Explore large Maps/Environments
- camera following an object
- Increase screen (viewport) size without scaling sprites/objects
Importing, Tilesets & Sprite Sheets
- Photoshop Setup
- Gimp Setup
Different Types of Movement
| Game | Step Based | Continuous | Momentum | Gravity | Perspective |
|---|---|---|---|---|---|
| Simplest | Frogger | Car (From Above) | Defender | Platformer | Subway Surfer |
| More Complex | Athletics | Pong | Asteroids | Angry Birds | Endless Runner |
| Alternative | Skier | Flappy Bird |